Few things are as frustrating in a kitchen as a dishwasher rack that stubbornly refuses to glide. You’re ready to load or unload, and suddenly, your culinary rhythm is broken by a snagging, sticking, or completely immobile rack. This common household annoyance isn’t just inconvenient; it can make daily chores feel like a battle. But don’t despair! With a little know-how and some basic tools, you can often diagnose and fix the problem yourself, restoring your dishwasher’s smooth operation and your kitchen’s harmony.
Understanding why your dishwasher rack isn’t rolling out smoothly is the first step toward a successful fix. From simple obstructions to more complex component failures, several factors can prevent your racks from gliding effortlessly. Let’s dive into the common culprits.
Understanding Why Your Dishwasher Rack Gets Stuck
A stuck dishwasher rack can stem from various issues, each requiring a specific approach. Pinpointing the exact cause will save you time and effort, ensuring you apply the right solution.
Obstructions: The Obvious Culprits
|
Our Picks for the Best Dishwasher in 2026
As an Amazon Associate I earn from qualifying purchases.
|
||
| Num | Product | Action |
|---|---|---|
| 1 | Cascade Platinum Plus Dishwasher Pods, Dish Detergent Soap, Clean Scent, 62 Count |

|
| 2 | Kenmore 24" Premium Hybrid Tub Dishwasher - UltraWash, MoreSpace Adjustable Rack, High Temp & SmartWash - 12 Place Settings - 54 DBA - ENERGY STAR Certified - Fingerprint Resistant Stainless Steel |
|
| 3 | COMFEE’ Countertop Dishwasher, Energy Star Portable Dishwasher, 6 Place Settings & 8 Washing Programs, Speed, Baby-Care, ECO& Glass, Dish Washer for Dorm, RV& Apartment, Black |
|
| 4 | EUHOMY Countertop Dishwasher Portable with 6 Programs, 5L Built-in Water Tank for Apartments & RV, 167℉ High-Temp, No Hookup Needed, Mini Dishwasher with Baby Care, Air Dry/Quick/ECO/Fruit/Normal Mode |
|
| 5 | BLUELAND 100% Plastic-Free Dishwasher Detergent Tablets, 60 Count, Free & Clear, Eco-Friendly Dishwashing Pods, Natural, USDA Certified biobased |
|
| 6 | Cascade Complete Dishwasher Pods - Fresh Scent ActionPacs, Dishwasher Detergent, Dishwasher Soap, Detergent Pods, 78 Count |
|
| 7 | Cascade Complete Dishwasher Detergent Liquid Gel, Dish Detergent, Dishwasher Soap, Citrus, 75oz |
|
| 8 | COMFEE’ Portable Mini Dishwasher, Energy Star, Countertop, 6 Place Settings, with 8 Washing Programs, Speed, Baby-Care, ECO& Glass, Dish Washer for Dorm, RV& Apartment, White |
|
| 9 | Sharp SDW6504MS Stainless Steel Dishwasher, 24-inch Pocket Handle, 52 dB, Hybrid Tub, 12 Place Settings, 5 Cycles, Heated Dry |
|
| 10 | Honeywell 18 Inch Dishwasher with 8 Place settings, 6 Washing Programs, Stainless Steel Tub, UL/Energy Star- Black |
|
Often, the simplest explanation is the correct one. Small items like fallen silverware, food debris, or even a stray piece of plastic can get wedged in the rack’s pathway or under its wheels. These unexpected blockages prevent the wheels from turning freely or the rack from moving along its track, leading to immediate resistance. Always check for visible obstructions first; a quick glance can often reveal the problem.
Buildup: Hard Water and Detergent Residue
Over time, mineral deposits from hard water and leftover detergent residue can accumulate on the rack wheels, tracks, and even the interior of your dishwasher. This sticky film acts like glue, increasing friction and causing the wheels to drag or seize up entirely. If your dishes also show signs of white film, this is a strong indicator of buildup affecting your rack’s movement. Regular cleaning is crucial to prevent this common issue.
Worn or Broken Rack Wheels
The small plastic wheels or rollers on your dishwasher racks are designed for continuous motion, but they’re not indestructible. With constant use and exposure to heat, moisture, and detergents, these wheels can crack, break, become brittle, or even pop off their axles. A missing or damaged wheel can cause the rack to tilt, grind, or completely prevent it from moving along its track. This is especially common for the bottom rack, which often bears the heaviest loads.
Damaged or Misaligned Tracks and Rails
Beyond the wheels, the tracks or rails within the dishwasher tub that guide the racks can also be a source of trouble. These tracks can become bent due to impact, heavy loading, or simply age. If a track is warped or if the brackets holding it in place become loose, the rack’s wheels might catch, creating significant resistance. Rail stops, small plastic clips at the end of the tracks, can also break or come loose, affecting the rack’s travel.
Rust and Corrosion
While less common as a direct cause of a stuck rack, rust and corrosion on the metal parts of your rack can certainly contribute to the problem. If the protective vinyl coating on your rack wears away, the underlying metal is exposed to water and detergent, leading to rust. Rusty spots can create uneven surfaces or sharp edges that snag, further hindering smooth movement and potentially damaging dishes.
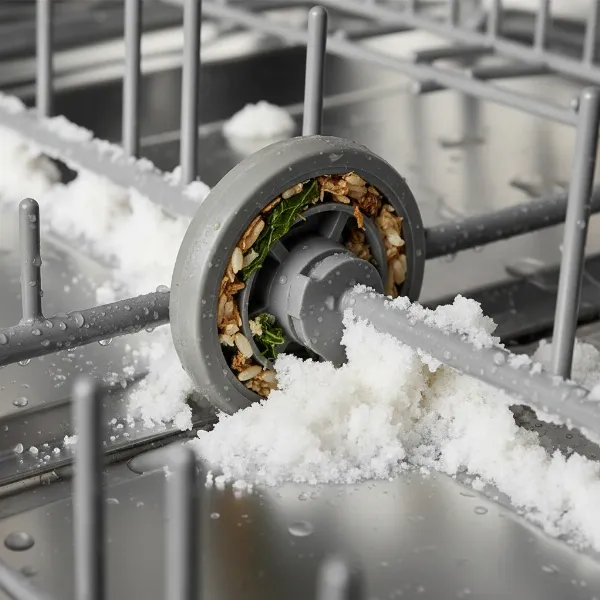 A close-up of a dishwasher rack wheel stuck due to food debris and hard water buildup on the track, illustrating common causes of immobility.
Essential Tools and Safety Precautions
Before you begin any repair work, gathering the right tools and taking necessary safety measures are paramount. Your safety comes first, and having the correct equipment will make the job much easier and more effective.
Tools You’ll Need
Most dishwasher rack fixes require only a few common household tools:
- Flashlight: To inspect hard-to-see areas inside the dishwasher.
- Cleaning Supplies: White vinegar, citric acid, a stiff brush or old toothbrush, and a dishwasher cleaner.
- Screwdriver: Phillips or flathead, depending on your dishwasher model, for removing rail stops or other components.
- Pliers: Needle-nose or standard pliers for straightening bent tines or manipulating small parts.
- Replacement Parts: New rack wheels/rollers, rail stops, or rack repair kits (e.g., vinyl paint, tine caps).
- Food-Safe Lubricant: Silicone-based lubricant, if tracks are excessively sticky after cleaning.
- Work Gloves: To protect your hands.
- Towels or Rags: For cleaning and soaking up spills.
Safety First: Unplug and Clear Out
Always prioritize safety. Before attempting any repair, ensure the dishwasher is completely disconnected from its power source by unplugging it from the wall outlet or turning off the circuit breaker. This prevents accidental activation and electric shock. Additionally, remove all dishes, silverware, and the detergent dispenser from the dishwasher. A clear and dry interior makes inspection and repair much simpler and safer.
Step-by-Step Fixes for Common Dishwasher Rack Problems
Now that you understand the potential causes and have your tools ready, let’s walk through the most common fixes to get your dishwasher rack rolling smoothly again.
Cleaning for Smooth Operation
Often, a thorough cleaning is all it takes to resolve a sticky rack. This is the simplest and most cost-effective solution, so it’s always a good starting point.
Removing Debris and Obstructions
- Visually Inspect: With the rack pulled out as far as it can go (or removed entirely if possible), use your flashlight to carefully examine the tracks, the area under the rack, and the wheels for any visible obstructions.
- Clear Blockages: Gently remove any food particles, silverware, or other items that might be caught. A pair of pliers or even tweezers can be helpful for stubborn pieces. Wiggle the rack back and forth to dislodge anything hidden.
Tackling Hard Water and Soap Scum
If obstructions aren’t the issue, mineral and detergent buildup is a likely culprit.
- Dishwasher Cleaner: Use a high-quality dishwasher cleaning product (e.g., those containing citric acid) and run an empty hot water cycle according to the product’s instructions.
- Citric Acid Method: Pour 1 cup of citric acid powder into the detergent dispenser and run an empty hot water cycle. Leave out any metal items during this cycle.
- Vinegar Rinse: After the detergent cup opens in a normal (but empty) cycle, pour 1 cup of white vinegar into the bottom of the dishwasher and let the cycle complete. This can be repeated periodically for maintenance.
- Manual Scrubbing: For localized buildup on wheels and tracks, use a stiff brush or an old toothbrush with a vinegar solution to scrub away residue. Ensure all grime is removed, then rinse thoroughly.
Replacing Worn or Broken Rack Wheels
Damaged wheels are a frequent cause of a non-rolling rack. Fortunately, replacing them is a straightforward DIY task.
Identifying Compatible Parts
Before buying replacements, check your dishwasher’s make, model number (usually found on a sticker inside the door), and the specific rack (upper or lower). Dishwasher rack wheels are not universal; purchasing the correct parts is crucial for a proper fit and function. You can often find them online by searching your dishwasher’s model number + “rack wheels.”
Removing the Old Wheels
- Remove the Rack: Fully extend the rack. For the upper rack, you might need to remove plastic end caps on the rails, often by prying them off with a flathead screwdriver or pressing a tab, allowing you to slide the rack out. For the lower rack, simply lift it off its track.
- Detach Wheels: Examine how the wheels are attached. Many simply snap onto plastic axles or clips on the rack frame. Gently press, pry, or twist to release the old, damaged wheels. Some older models might have a screw, requiring a screwdriver.
Installing New Wheels
- Align and Secure: Take your new wheel assembly. Align its axle or clip with the designated slot on the rack. Apply firm pressure or snap it into place until it clicks securely.
- Test Movement: Once all new wheels are installed, manually rotate each wheel to ensure it spins freely.
- Reinstall Rack: Slide the rack back into its tracks. If you removed end caps for the upper rack, snap them back into place. Test the rack’s movement to confirm it glides smoothly.
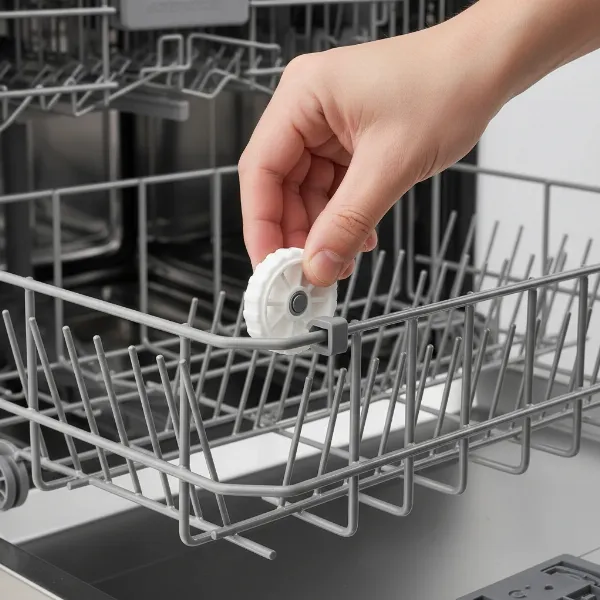 A close-up of a hand replacing a broken plastic wheel on a dishwasher rack, demonstrating the repair process.
Repairing Damaged Tracks and Rail Stops
If the problem isn’t with the wheels or cleanliness, the tracks themselves might be the issue.
Inspecting Tracks for Bends or Damage
- Examine Rails: Pull out the rack and carefully inspect the metal or plastic rails inside the dishwasher tub. Look for any visible bends, dents, or signs of wear.
- Straighten Gently: If you find a slightly bent metal track, you might be able to gently straighten it with pliers. Be very cautious not to over-bend or break the track. If the damage is severe, the entire track assembly might need replacement.
Securing Loose Brackets
Sometimes, the brackets that hold the tracks in place can loosen. Tighten any visible screws that secure these brackets to the dishwasher tub. If a bracket is broken, you might need a replacement part.
Replacing Broken Rail Stops/Clips
Rail stops are small components at the end of the tracks that prevent the rack from coming all the way out.
- Locate and Inspect: Identify the rail stops. They are usually plastic and might be screwed in or snapped on.
- Remove Old Stops: If screwed, use a screwdriver to remove them. If snapped, gently pry them off, being careful not to damage the surrounding rail.
- Install New Stops: Secure the new, model-specific rail stops by screwing or snapping them into place. Ensure they are firmly attached.
Lubricating Tracks
After cleaning and repairing, if the tracks still feel sticky, a small amount of food-safe silicone lubricant can help. Apply a thin layer to the top and sides of the tracks, then slide the rack back and forth several times to distribute it evenly. Avoid using petroleum-based lubricants, as they can attract dirt and potentially damage plastic components over time.
Addressing Rust and Corrosion
While not always the direct cause of a stuck rack, rust should be addressed to prevent further damage and maintain hygiene.
- Clean Rusty Spots: Remove the rack and use a wire brush or fine-grit sandpaper to gently scrub away any rust. Clean the area thoroughly with rubbing alcohol and let it dry completely.
- Apply Protective Coating: Use a specialized dishwasher rack touch-up paint or vinyl repair coating. These products are designed to seal the exposed metal and prevent future rust. Follow the product instructions for application and drying time.
- Use Tine Caps: For rusted or broken tines (spikes), you can often find rubber or vinyl caps that slip over the ends. These not only prevent rust but also protect your dishes from scratches.
“Many common dishwasher rack issues are surprisingly simple to fix with the right tools and a little patience. Don’t underestimate the power of a thorough cleaning and replacing a few worn components.” – Sarah Jenkins, Appliance Repair Specialist
When to Consider Professional Help or Rack Replacement
While many rack issues are DIY-friendly, there are times when calling a professional or considering a full rack replacement is the more sensible option.
If you’ve tried all the troubleshooting steps and your rack still won’t roll, or if you encounter extensive damage such as severely warped tracks, multiple broken components, or widespread rust that affects the structural integrity of the rack, it might be time for expert intervention. A professional appliance technician can accurately diagnose complex issues, source specific parts, and perform repairs that require specialized tools or knowledge. They can also advise you on whether the cost of repair outweighs the cost of a new rack or even a new dishwasher.
In some cases, especially with older dishwashers or if multiple parts of the rack system are failing, purchasing a complete replacement rack might be more economical and provide a longer-lasting solution than piecemeal repairs. Check your dishwasher’s model number and explore options for genuine replacement racks from the manufacturer or reputable third-party suppliers.
Maintenance Tips to Prevent Future Rack Issues
Preventing problems is always better than fixing them. Regular maintenance can significantly extend the life of your dishwasher racks and ensure they continue to glide smoothly for years to come.
- Load Dishes Properly: Avoid overloading the racks, which can put undue stress on the wheels and tracks. Distribute dishes evenly and ensure no items protrude or get caught when the rack is moved.
- Use Rinse Aid and Quality Detergent: Rinse aid helps prevent water spots and hard water buildup, keeping your dishes and dishwasher interior cleaner. High-quality detergents are also less likely to leave residue.
- Regular Cleaning: Periodically run an empty dishwasher cycle with a specialized cleaner, citric acid, or vinegar to remove buildup. Wipe down tracks and wheels with a damp cloth every few weeks.
- Inspect Periodically: Every few months, take a moment to inspect your racks. Check the wheels for wear, the tracks for debris, and the tines for rust. Addressing small issues early can prevent them from becoming larger problems.
- Clear Obstructions Immediately: If you notice a utensil or food particle causing resistance, remove it right away. Don’t force the rack, as this can bend tracks or break wheels.
By integrating these simple habits into your routine, you can significantly reduce the chances of encountering a frustratingly stuck dishwasher rack.
Conclusion
A dishwasher rack that won’t roll out smoothly can bring your kitchen routine to a grinding halt, but it doesn’t have to lead to a costly service call or appliance replacement. By systematically addressing common issues like obstructions, hard water buildup, worn wheels, and damaged tracks, you can often restore your dishwasher’s full functionality with simple DIY fixes. Regular cleaning and mindful loading are your best defense against future problems, ensuring your dishwasher remains an efficient and hassle-free helper in your home. Why struggle when a smooth glide is just a few steps away? What’s the most common DIY fix that has saved you from a sticky situation in the kitchen?
Frequently Asked Questions
Why does my dishwasher rack keep falling off the track?
Your